Designed, built, installed and grouted! Here are the final pics.


 Here it is! This is really exciting for several reasons. I don't have a table large enough to to hold the entire project. For that last several days I have been working on individual parts of the project and haven't been able to see the how the project is coming together. Here are some pics to catch you up.
As it comes together . . .


 As started working on the lower portion of the box that comes forward with the hearth, I wanted to make sure everything was aligned. So, I shifted the panel I was working on and lined it up with the front panel. Seeing it like this, it all started coming together for me and I started to get excited.

 Here are the latest pics. I am steadily moving along and if I can decide what to do, just might finish the front this weekend. As I am sure you all figured, the install scheduled for this weekend didn't happen.
 My latest dilemma is the the set of circles in the center of the horizontal hearth - the heart of the hearth. I have to look back to see what I originally had planned, but at one point I changed my mind and now I am stuck.
 So, I took my latest pictures into PhotoShop and did some coloring to help me make up my mind. These are the two schemes I tried. I am having my age old struggle of "what color would be a logical result of these two colors mixing." I wish I could throw that out the window and just do something radical. Maybe someday. For now this is what I am thinking. What do you think?
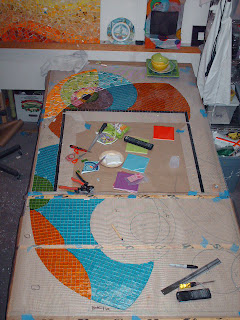
 With the intersecting circles basically finished (still haven't decided on the changes talked about last time, but I have plenty to do, so I will let them go for now), I have moved on to the base of the fireplace enclosure -- the horizontal hearth and the front face of the box. I finished the orange and the turquoise, no problems, no questions, and started into the first mirrored section.
 The client and I had discussed these areas a little. We talked about the mirror being laid in an irregular pattern with some sparkly textured mirrors mixed throughout. My first thought was all squares, but that felt too structured. So, I through in some irregular shapes and diagonals. However, as the area began to grow, I wasn't liking the look as compared to the Karma tile areas. The tiled areas are all done in a regular pattern of gridded squares. I felt that the mirrored tiles needed to reflect some of that regular pattern, but being the contrarian that I am, I felt it needed to "move" a little more. So, I started to work the mirrored tiles into regular rectangles and rows, but not just normal rows, but rows that flow. I am liking it.
  I have to admit that I wasn't so sure that this project was working out. I think I go through that at some point on every project, but I didn't want to say anything because the client has access to this blog ;) So, I pressed on and now it is feeling right.
 I have been stuggling with the colors of the tiles. My original plan was that the intersecting circle on the right would be differentiated by materals, and the circle on the left would be set apart by a change in the colors. And the original design had the third circle from the center as pink, but there wasn't a pink in the Karma tile. So, I tried the red, but it just wasn't working for me. I was thinking about changing the entire circle colors to red, but I decided to stick with my original inclination. I studied but really needed to see the entire eye together before I could make a decision.

 I think I am finally done with the tiles. Can I be real? I have just affirmed why I don't work with little square tiles on a regular basis. I don't know if it is the media or my eye that demands perfection, but I just do not have the patience for little square tiles!
 So, after half a day of futzing and putzing, I think I am done with the Karma tiles. Wahoo! Of course now that I have said that, I will find more things to fix, but the bulk of it is done. Here is a look at the project.
  There were a few tense moments when I began to lay out the turquoise colored areas. What you see pictured is ALL the turqoise tile I had. As you can see, it came down to almost the square inch! I don't know if I am that good, or just that lucky :)
 Wow, I sent out an e-mail to let people know that I am doing this, and the response has been amazing. Thanks everyone for your interest.
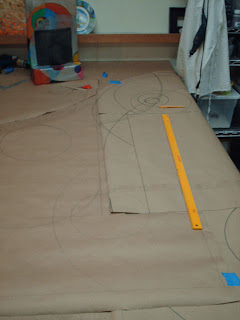 Once the template is drawn it needs to be covered with plastic and a fiberglass mesh that the pieces will be glued to. The plastic is to keep the pieces from sticking to your pattern. On a large project like this it is typical to build it on mesh or paper (in reverse) so that it can be built and transported to the site for installation as opposed to building it on site.
I separated the bottom two panels from the actual front that surrounds the fireplace opening and put them on one board (so they can be moved around easily) and left the rest on the table.

 I then pulled out the Karma tiles and started to figure out how I was going to put them in the different spaces. Of course I labeled each section with its appropriate color according to the model.
 And then I began to cut.
 And I cut . . .


 Hi Everyone, here are the latest pics.